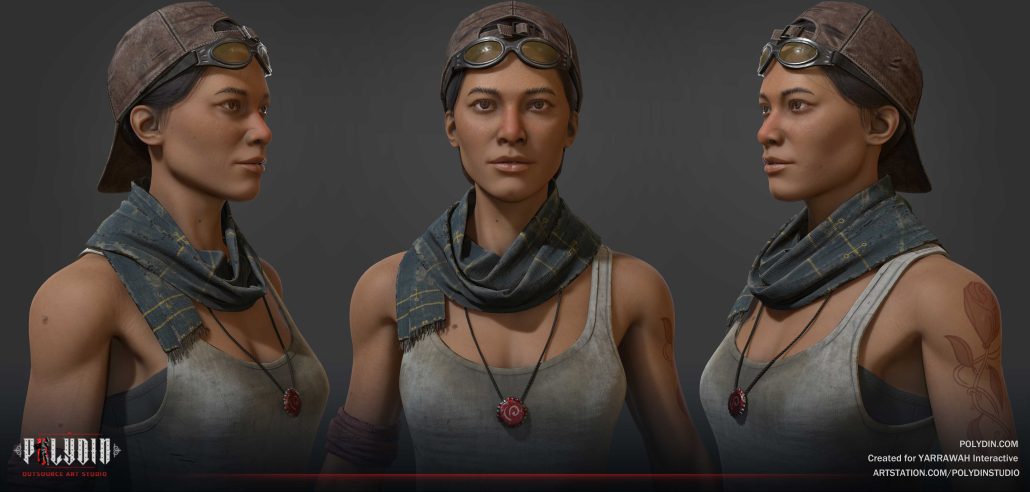
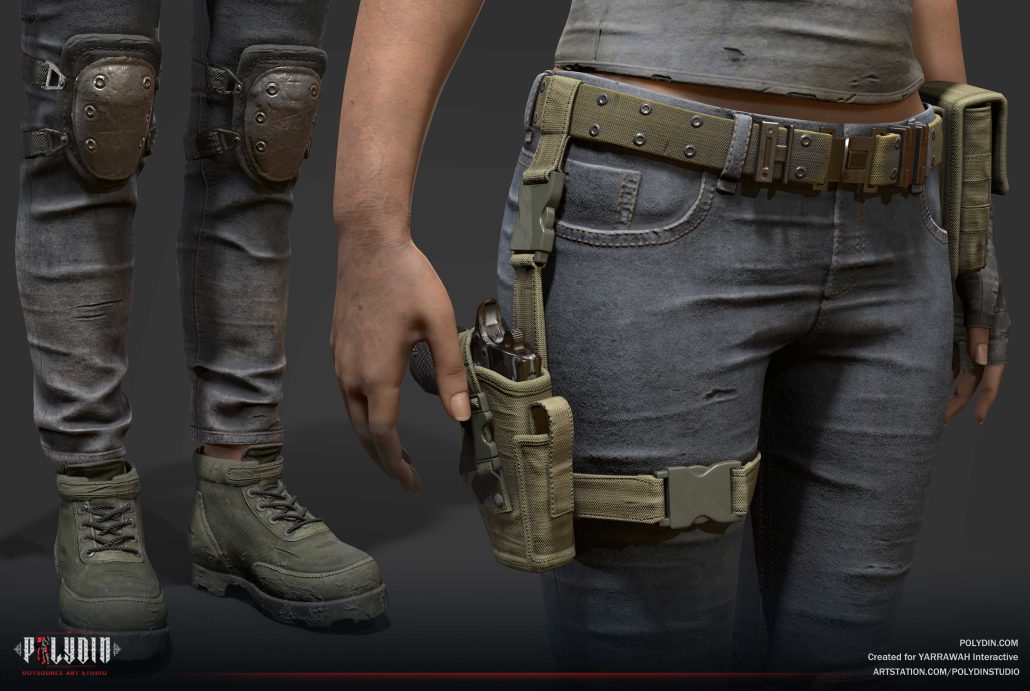
The terms “character art” and “character artist” might seem self-explanatory. It’s all about designing digital characters and bringing them to life, right? That’s a huge part of it. But it’s not limited to that. Character art can also include designing the environment, weapons, vehicles, and props that a character wears. So it has become a whole profession with its rules and conventions.
In this blog post, I want to give some general tips on becoming a better character artist. This information is handy if you’re a newcomer in the industry.
Getting Familiar with the Necessary Tools
The most fundamental thing you must do is get familiar with all the tools a character artist needs. By that, I don’t mean memorizing all the different shortcuts and neat tricks you can do with a tool, the kind of stuff that makes your learning feel clever but shallow. What I am advocating for is knowing the core principles of each software. Many details of digital tools change from patch to patch, but their essence remains the same. Once you understand what each software is and isn’t capable of, your life becomes much easier. It sucks to suddenly realize you could do that particular thing with that specific software much more effectively, but you never knew it existed. When learning new software, be careful about being blindsided by everything you don’t know. Learn the general functions quickly, and don’t get hung up on details. Details will come to you when you need them.
The first tool that comes to mind is Zbrush. Zbrush is the strongest software for designing digital sculptures. Character is organic, so you can’t rely on box modeling anymore. Zbrush helps your characters seem soulful, real, and very detailed. Some multi-purpose tools like Maya, 3D Max, or Blender can also be used for modeling, rigging, texturing, animation, and rendering. You can technically sculpt with a tool like Blender, but it won’t be as good as Zbrush. A tool specifically designed for one purpose will always be better than its “Multi-purpose” counterpart, which should be used alongside it.
Another set of “function-specific” software you need to learn is used for texturing. The most relevant ones are Adobe Substance Painter and Mari. Substance Painter is procedural and does some work for you, but Mari requires you to paint each layer and channel individually. So it gives you more freedom and control at the expense of taking more of your time. Substance Painter is usually the industry standard.
One thing you must remember while texturing in Substance Painter is that it’s too easy to get lost in all the smart materials. At first, it might make life too easy and give one the illusion of being the jack of all the texturing (and the fact is true, smart material does make life easier). However, you will grow dependent on smart materials and be tied down to them. One of the most fundamentally important aspects of texturing in Substance Painter is KNOWING how to make masks and use your mesh maps, noises, and generators to achieve the mask you’re looking for.
Since we’re getting specific, let’s get REALLY specific. Two almost identical tools, Marvelous Designer and Clo3D, are dedicated to designing cloth. They’re the best realistic cloth-making program for 3D artists. Learning them doesn’t take much time and can be pretty handy in the long run.
As you can see, all the intricate details of character design, down to simulating cloth movement, have their own dedicated software. A voice in the back of your head might tell you: “just learn Maya. You’ll get by.” But don’t listen to it. By expanding your familiarity with all kinds of tools and using each to complement the other, you can significantly increase the quality of your work.
Do Not Skip the Stages of Sculpting in Character Art
After you get the hang of each software, you must understand how to make a great digital sculpture. Each sculpture goes through 4 stages:
- Primary Form: large basic shapes and silhouettes of character
- Secondary Form: muscles and folds of flesh
- Tertiary Form: wrinkles and scale details
- Rendering High-Frequency Details: pores the highest level of surface details and imperfections
One of the common mistakes I see in character art is that people ignore the second and tertiary forms and go straight to the last stage, which is rendering high-frequency details. That doesn’t result in a good sculpture. It’s essential to go through each stage and add the necessary details.
Find as Many References as Possible
Just like drawing, sculpting a character needs references; you need as many as you can find. Whenever I receive a new project, I spend a whole day finding references before working on it. For example, if I had to design a character with a certain haircut, I would find many pictures featuring that haircut from different angles to know how to recreate it. If I had to design a particular dress, I would find as many references as possible featuring it to get familiar with the intricacies of its sewing and the way it folds. Then I will apply this information while working on it with Marvelous Designer.
It’s important to note that references don’t necessarily have to be real-life pictures. You can also use the works of other artists as inspiration. However, you must be careful about an inevitable trap that many artists fall into, both for yourself and the artists whose work you use for inspiration: you need to design what you see, not what you “think” you see. You need to keep your imagination and artistic ego in check.
Understanding Anatomy
Ever since the days of the Renaissance, artists were forced to become anatomists because their mission was to be as realistic and life-like as possible in their artwork. Still, this hasn’t changed. Some veteran character artists might be informed about the anatomy of humans and animals as much as a biologist.
Anatomy has many different aspects: human, animal, and fantastical creatures; we can even talk about the anatomy of cloth. But one feature that is equally important in all kinds of anatomies is proportion: the way body parts are situated in relation to each other.
It’s important not to be obsessive about specific details when getting proportions right. You don’t need to scientifically understand how your character’s biceps or deltoids would react if they raised their hand. On the basic level, it’s essential to find out simple information like the length of the feet, torso, hands, etc.

Another crucial thing to pay attention to is the proportion of the face components. For example, if you are designing a good-looking character, you must determine what kind of facial proportion can create handsome features.
On the next level, you need to pay attention to the anatomy of cloth. Cloths have different folds, like:
- Gravity fold
- Dropping fold
- Pipe fold
- Stretching fold
- Diaper
- Compression fold
- Zigzag fold
- Half lock fold
- Spiral fold
- Memory folds
Each fold happens during a different kind of animation. For example, compression fold happens when a character bends their body parts from a particular joint. Since clothes are part of a character, as a character artist, you must get familiar with how clothes fold.

After you get the proportions right, it’s time to pay attention to what lies underneath the cloth; in other words, the scientific part I mentioned earlier.
Don’t try to master the anatomy of movements with a few days of binge-training or watching tutorials. This is by far the most challenging part of the anatomy, and it takes years to master the anatomy of humans, let alone the anatomy of animals and other creatures.
But once you master the anatomy of humans, it’s smooth sailing from then on. Because humans and other creatures like birds, mammals, or even fantasy creatures share many of the same body parts, their placement and scale differ.
Never Stop Learning
If you ever reach a point when you think: “I know everything I need to know,” stop that line of thought right then and there. Character art is a challenging profession with an almost boundless skill set. There’s always someone out there who can do what you did better. Find that person, analyze their work and think about what it is about their work that made it better than yours. Never stop learning. Never stop improving. Artistic ego is one of the most dangerous mindsets to have as a character artist, so again: keep it in check.
How to Become a Better Character Artist: Improve Your Concept Skills
Strong concept skills are the backbone of great character art. Before sculpting or modeling, a clear design foundation ensures visually compelling results.
Master the Fundamentals
Shape language, silhouette, and proportion define a character’s personality. Sharp angles often suggest aggression, while soft curves evoke warmth. Gesture drawing helps bring life and movement into designs, making characters feel dynamic rather than stiff.
Use References Effectively
Even stylized designs need grounding in reality. Studying anatomy, clothing, and materials improves believability. Avoid copying a single reference; mixing multiple sources leads to unique results.
Explore Different Art Styles
Versatility is a strength. Learning from various genres and mediums—from hyper-realistic to cel-shaded animation—broadens creative problem-solving skills and adaptability.
Optimize Your Models with Clean Topology
Even the best sculpted character becomes a nightmare if the topology is messy. Clean topology is essential for animation, rigging, and performance.
- Edge Flow Matters: Well-placed edge loops ensure smooth deformation, especially in high-motion areas like faces and joints. Poor edge flow can cause unnatural stretching in animations.
- Balance Polygon Density: Retopologizing high-poly sculpts efficiently preserves detail while keeping models optimized. Games require lower poly counts than film, but both demand well-distributed geometry.
- Plan UV Mapping Early: Proper UV layouts prevent texture stretching and make texturing easier. A messy UV map can lead to unwanted artifacts, so organizing it properly is crucial.
Common Mistakes in How to Become a Better Character Artist
Pitfalls in the Sculpting Process
Jumping into details too soon weakens the overall form. Strong primary shapes and a clean silhouette should come first; details only work when built on a solid base.
Texturing Traps
Procedural textures can’t fix weak sculpting. Relying on surface noise instead of understanding material properties results in artificial-looking models.
Anatomy Errors
Even stylized characters need proper structure. Misplaced joints and unrealistic proportions make animations look awkward. Studying real anatomy improves both realism and exaggeration.
Reference Misuse
One reference limits creativity, while no references lead to unrealistic designs. Blending multiple sources ensures originality while staying grounded.
Workflow Bottlenecks and Inefficiencies
Skipping blockouts, rushing UVs, or ignoring retopology creates problems later. A structured workflow saves time and improves consistency.
Portfolio Mistakes
Too much clutter weakens impact. A strong portfolio highlights only the best work, with clear breakdowns and variety.
Focusing on structure, efficiency, and thoughtful presentation helps character artists grow and stand out.


